After uploading the pictures for this post, I quickly realized that this was going to be a big mouthful of {useless} information. :) So feel free to simply skim through the pictures if you tire of my rambling. ;)
For starters, for my entire married life (up until today) I have never had a bedroom of my own (shared w/ Mr. B. of course) that I actually loved being in. I realize we all have to start out somewhere when we're newlyweds, (especially when you wed at the young ages of 18 and 22) Our start was a mattress on top of some box springs, the cheapest comforter we could afford, cardboard boxes to hold our alarm clock (aka night stands) and a gratefully accepted hand-me-down dresser with yarn being used in place of the missing drawer pulls. Seriously, that was our bedroom for the first year of our married life. Sometime during our second year of marriage we broke down and bought some UBER cheap (and ugly) nightstands and some tiny little table lamps... which unfortunately we still have, and are using today. I am holding out to find THE perfect nightstands, but it's difficult, because I know exactly what I want, and I won't settle for less this time, so it's going to take a while.
After building our forever home, I was DETERMINED to get a dresser of my own and a headboard/frame for the bed. I didn't know what else I really wanted for our bedroom, other than some wainscoting on the walls. We had our "finish work dude" put up the wainscoting for us, but didn't even bother with some trim around the windows. WHY?? I don't know, I ask myself the same thing. Trying to save some money I guess. Oh well... Step one, DONE. And then it sat like this for the next four years...


Anyway, you can imagine my pure excitement when Mr. B. gave me the okay to give our room a true make-over! After years of putting my children's rooms/rest of the house before a space of my very own, I was definitely ready to "play it selfish" and decorate a space just for me! (and Mr. B too, of course) ;) Our room is on the "wrong" side of the house, not much light is able to come in, so it's not very bright back there, so the first step was to paint the ceiling white! (It was originally the same color as the walls) I think that alone made for the biggest improvement in this space! But just a heads up, all of the pictures below were taken with my phone... HORRIBLE quality/light, so they really don't do the paint color, or any of the details for that matter, justice. (I was struggling with my camera, I really, REALLY need a shorter lens! Anyway, so this is what you get, sorry. :/)
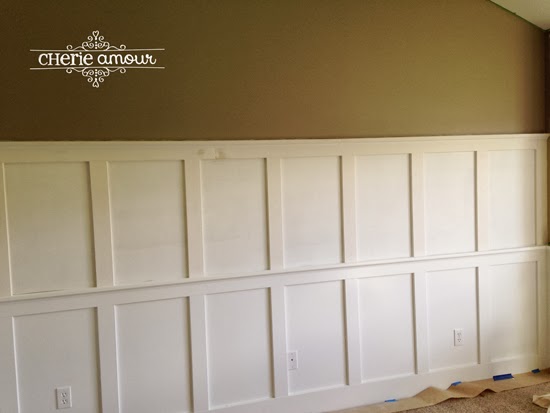
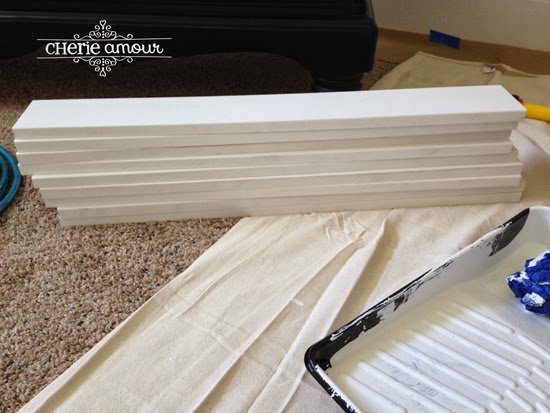
After painting the ceiling, we started priming one wall so I could heighten the pre-existing wainscoting. I LOVED how tall my SIL's was, over at
Country Girl Home! (and her detailed photos, and tutorial or MUCH better than mine, so go check hers out!) Tall wainscoting really brightens up a space, and in my opinion makes a room feel bigger!
We wanted it to match exactly with what was already there, so Mr. B found the right size boards and cut them down to size...
And up they went... there was a tiny "oops" with one of his cuts not being perfect, but we covered it up later with some caulking. :)
Next came the trim piece on top...
Where the boards meet, Mr. B cut them at an angle for a tighter fit...
(below is what the original looks like)
And this is our trim work that we found to match (before caulking)...
We also added the same trim work around our windows...
And primed some more...
Caulking can be tedious, but NECESSARY. Cover up all of those holes and cracks/imperfections...
Ready for some real paint!!
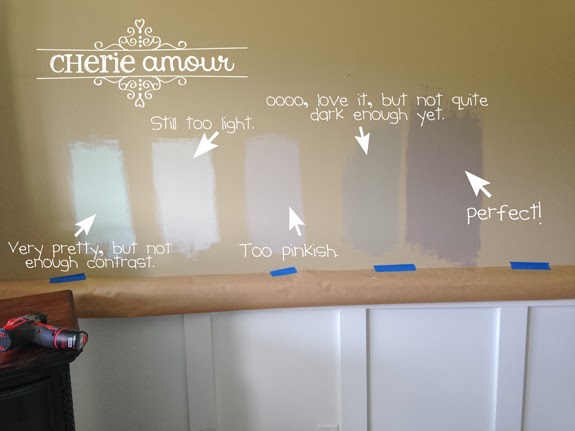
Choosing the wall color was probably THE hardest task in this project!! I'm HORRIBLE at picking out paint colors, I always get it wrong. In our first house, I wanted a light tan, and somehow the "tan" I chose had a pink undertone, and we painted the entire house that color. I hated it, and had no choice but to live with it. When we built our forever home I wanted to try again for the perfect tan, fearing for more pink, I steered clear away from those tones... and ended up with a yellowish hue instead. Ugh. Frustrating!! But it was MUCH better than pink, and I could (and have been) definitely living with it. :) For our Bedroom, I kept going back and forth in my head from a blue or a gray. I needed some serious help, I was bound and determined to get it right this time. So where did I turn? Pinterest of course! After searching, I went out and had 5 samples made up... Obviously with only one hue of blue picked out, I knew I was going to end up going with gray, but I seriously love that blue so much, I'm going to find a way to incorporate it into the space somehow. One of the nightstands perhaps? ;)
By the way, painting is a JOKE with toddlers at foot...
We had to resort to painting only at night after the kids were in bed, or take shifts on the weekends when both Mr. B and I were home. But, after I think two weeks, we were FINALLY done painting!!!!
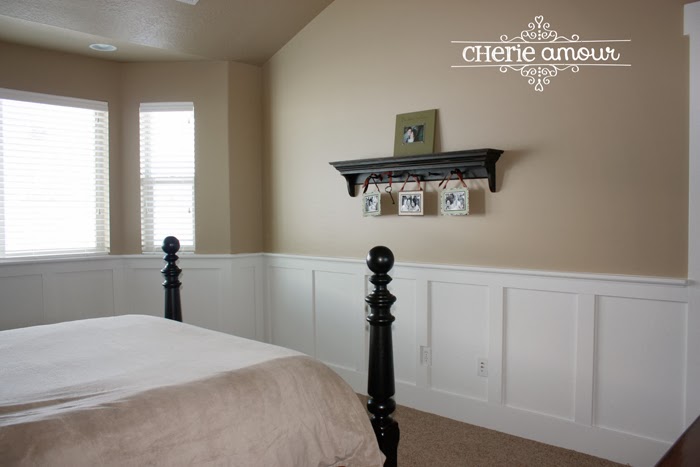
Only to then go and put more holes in the walls...
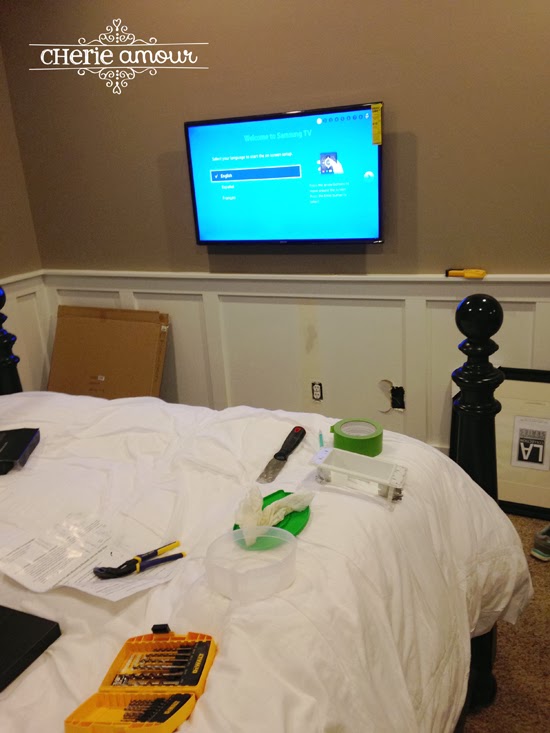
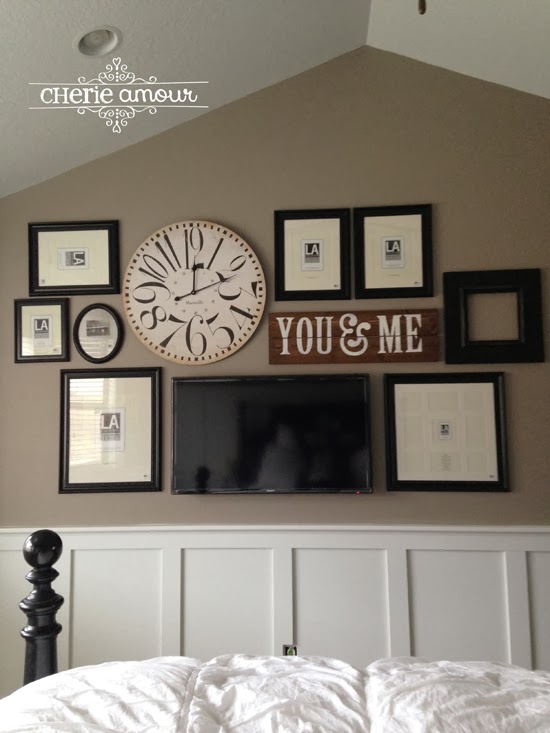
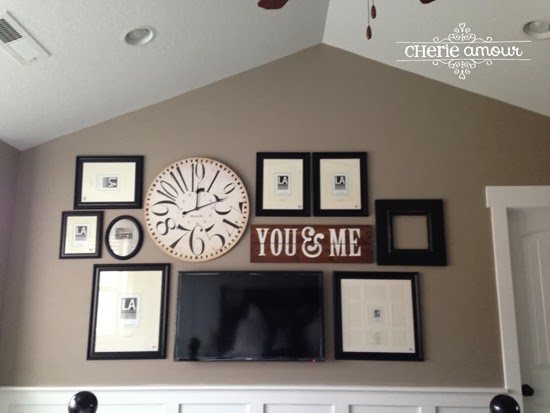
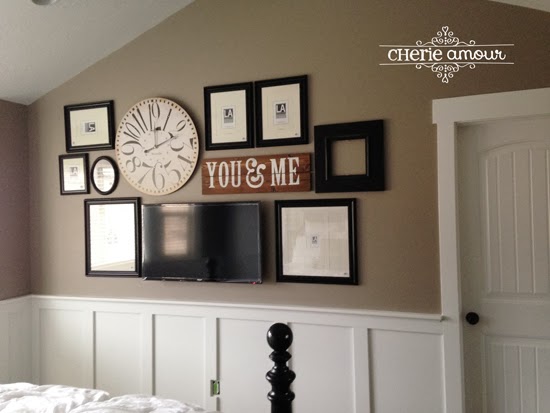
Mr. B got his Christmas present early, and he made it so there were no cords hanging anywhere (which required making holes, and moving an outlet and such) He even pulled a cord under the floor, and coming up on the other side of the room by our bed to hook up the DVD player. We plan on hiding the DVD player in the nightstand, when such item is found, or made, if I find myself getting impatient searching for the right one. If it were a perfect world, I would've been able to hide that TV completely from sight. Not having a TV was not an option, as this was my compromise with Mr. B to let me do whatever I wanted with the rest of the space, and our bedroom is too small for any more furniture (like an amour to conceal it) so, we had no choice but to hang it on the wall. I searched for ideas to conceal it on the wall, but everything was either very expensive, or I just didn't like the looks of it. Then I came across this photo from Pottery Barn:
SOURCE
I INSTANTLY fell in love!! I wanted to get something as closely resembling that as my budget would allow! :)
It took another few weeks to patch up all the holes, and touch up paint etc...
... and then came time for my favorite part of the room thus far... the gallery wall!!! I was ECSTATIC when I randomly came across a 60% off sale at JoAnn's! (Can you say serendipity?! I can't even remember what I went there for in the first place, but I wasn't hunting for frames at the time) The most expensive frame cost me $7.50, and it's a 16x20 frame! The clock was found at Rod Works, and if you remember from a previous post, I made the "You & Me" sign. yes, I still have to fill the frames with something pretty, and add a little something to that top right corner there, and replace the outlet cover, and many, many other things that were left incomplete in our room, but for now, this is where I'm at, and I'm happy and excited to FINALLY share my progress with you!!
I hope to get this space completed and perfected before June of next year. (We are slow and messy crafters) But I think I'm off to a great start (the hardest is out of the way anyhow) And perhaps I'll receive a shorter lens for mother's day, so I can take some descent pictures of this space! :) Thanks for stopping by!


Looks just perfect!! I LOVE the gallery wall I hardly notice the TV. And the tall wainscotting look so good. Great job. I will have to feature you on my blog.
ReplyDeleteThank you Lindsay!!
DeleteI LOVE this room! Will you please come decorate my home in the future when we move??? I have so many things I would like to do here but we don't think it's the best idea since we will only be in our current home for a couple more years. But...I want a room like this in my forever home too! You guys did a fantastic job!
ReplyDeleteShawnee, I know the feeling, it's the very reason that I lived with my "pinkish-tan" walls for three years, I didn't see the point in taking the time to redo it since we were only going to be there a few years. LOL. I don't think you'll need anyones help in the decorating though, you are a gifted girl!! ;) Thanks for your sweet comment! :)
DeleteWhat was the name and brand of the paint color you used?
ReplyDeleteHere is the link where I found that paint color, this blogger color matched, she gives the formula in this post. :) http://decorchick.com/shades-of-grey/
DeleteWhat was the name and brand of the paint color you used?
ReplyDeleteIt's beautiful dear. wire containers & heavy duty pneumatic casters
ReplyDeleteHi There, I just spent a little time reading through your posts,which I found entirely by mistake whilst researching one of my projects.
ReplyDeleteTo get new information visit here
home business ideas adelaide
home business ideas
What were the sizes of all the frames you used? I want to copy your awesome set up!!! Thanks so much!
ReplyDeleteReally loved this post! A thoughtfully chosen wall painting can instantly transform a space by adding color, emotion, and character. I enjoy how artwork brings personality to a room and makes it feel complete. I recently explored Vibecrafts’ collection, and their wall paintings are beautifully designed - perfect for adding a refined and artistic touch to modern home décor!
ReplyDelete