Tuesday, October 10, 2017

Our October Home {Fall Tour}

     I am so thrilled to have teamed up with some talented bloggers to share with you our homes adorned for October.  Whether it be some beautiful fall touches, or something fun for Halloween, we hope you'll find some inspiration to welcome the fall season into your own homes!  I will link to my fellow bloggers at the end of this post...  with that, welcome to my home!
 I made this Anne of Green Gables quote sign this year, and really wanted it to be the focus and first thing people saw when entering my home.  A simple pumpkin display was the perfect touch.  All pumpkins minus the far left white pumpkin were found at Michaels this year.
 I also made some simple pumpkin pillows.  I love a quick and free DIY!  You can find my tutorial for these pillows HERE.
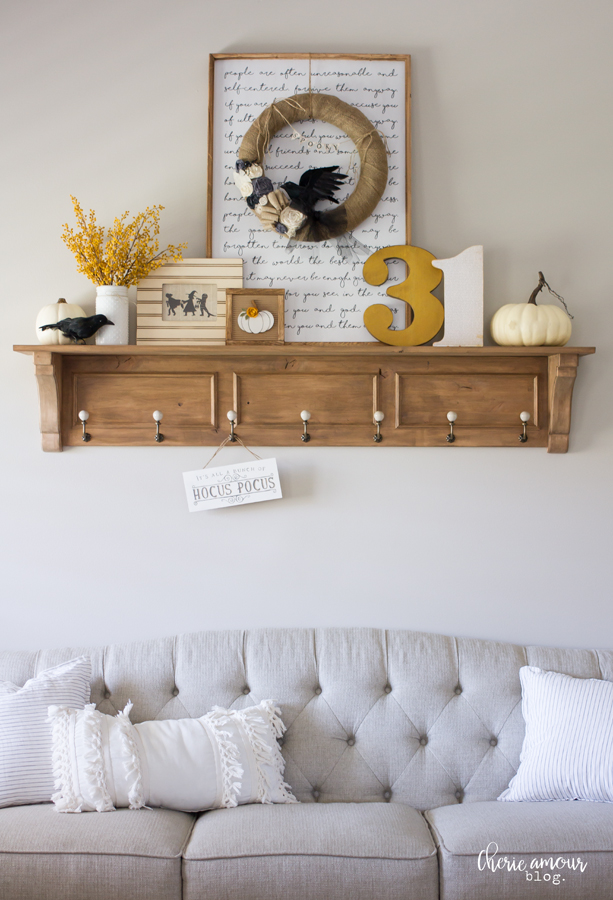
 My most recent project was this large 5 1/2 foot long shelf.  I sketched up the look I was wanting, and the Mr. brought it to life for me.  I am so thrilled with how it turned out!  The moment it was hung, the Halloween decorations came out.  haha!

 Many more DIY projects, from years past have made home on this shelf... trick or treaters were cut from my Silhouette machine.  The raven wreath was a DIY from a while back also.  The white framed pumpkin was a kit from Details 2 Enjoy from this year.  And the "31" was purchased from a local seasonal boutique.

 The "Hocus Pocus" sign was an on a whim craft, wanting to hang something from the hooks on my new shelf.  LOL.  It's a rather sloppy sign, but I figured it was just adding to the Halloween ambiance.


 Chalkboards have had my heart for some time now.  The Mr. made both of mine for me.  I love changing them out for each new season/birthdays.  He is just so good at bringing my ideas to life!  I only changed this one above though, to go along with the Halloween theme.  Sometimes I crave a little simplicity. Other times, I want to throw in everything and the kitchen sink.  LOL.  This time I went simple.
 I definitely had fun painting quite a few of my little pumpkins!  Both shown in the glass cloche above, and stacked in my lantern below.  My tutorial for these heirloom painted pumpkins can be found HERE.  And my lantern was created by the lovely Natalie from Crafts2You Parties.  Crafts 2 You is a local business creating unfinished crafts and signs for you to finish how you like.  If you are in Northern Utah and would like to know more, please send me a comment, or message over on my Instagram page: @cherieamourblog


 My talented SIL Cat from CatherinasCreativeCorner (who is also a part of this tour) made the chalk pumpkins for me last year!  I love them so much, and was so giddy to pull them out of storage.

 Paper bats flying up the wall are my kid's favorite touch.  They helped me hang them up too.

 Is Halloween decor ever complete without a witch's apothecary display?  I think not.  ;)

 I "borrowed" the printing trays that were intended to go in my son's room.  I don't think he'll mind (he's 5) and It's been months, and I still haven't gotten around to hanging them up yet.  LOL.  So to my shelf they went.

 My sofa table is easily one of my favorite spots.  One cannot have too many pumpkins, right? (More pumpkins from Michaels, and a few of the white ones are from AntiqueFarmhouse  Both the crate and Pumpkin Patch sign were purchased from Rod Works.  But you can find that same sign from DevanieAtHome
 And now we finally enter my kitchen/dinning The heart of the home...
 I made some Halloween party fans to add another pop of black and orange.
 The darling ghosts are from DevanieAtHome  Her shop has SO many wonderful things for every season!
 And then there are these finger plates.  Can I just talk about these for a quick second?  They make me smile every time I look at them.  They are from White and Fig.


 A table centerpiece that is easily removed for dinnertime is just what this family needed.  My favorite tray filled with DIY fabric pumpkins! (tutorial hopefully coming soon!)  Done and done.

 As I mentioned earlier, I only got around to changing one of my chalkboards.  This one still has our family's 2017-18 motto on it from our Back to School Feast.  But a simple Halloween banner has it ready for the upcoming spooky shindigs.  :)
And that concludes my October Home Tour!  I'm so happy you dropped by.  If there is anything I didn't leave a source to, it is probably because it is an old find, or an old craft.  Feel free to ask me any questions though!  And enjoy these other lovely homes...


Until next time!
-Cherie

Monday, August 28, 2017

DIY Pumpkin Pillows


 I have been swooning over all these pretty pumpkin pillows I've seen around Instagram land, but sometimes budget plays a part in my decorating adventures... so I ventured out to create my own Pumpkin Pillows with items I already had on hand.  They are very easy (I'm a sewing rookie) so if I can make these, you can too!  You just need some basic knowledge of how to use a sewing machine.  True story:  Right in the middle of this project my sewing machine stopped working for me.  It kept getting knotted up, and the fabric wouldn't move through.  After messing around with it for a while, I finally called my mom.  That sweet woman, who lives 45 minutes away from me, drove all the way out to save the day... only to find out I had it threaded wrong.  Oi.  I felt horrible that she took half her day just for that.  But what would I do without my sweet mother?!?  Even at 30, I need her every day.  LOL.  But again proof, that if I can make these, you can too.  ;)

 Items needed:

  • sewing machine
  • Scrap fabric
  • scissors
  • hot glue gun
  • twine
  • polly fill, or something to fill your pillow (I used tulle that I had on hand after I ran out of batting.  But you can even just turn these into a slip cover and use a pillow form you already have.  I didn't do that because I didn't have enough scrap fabric to do so.  So small pillows it was!)
I had a tiny bit of this textured white fabric left over from another project, and of course some burlap would make for a cute stem!

 The pattern:  you can easily draw your own, and there are lots of free ones on Pinterest!  I found this one from Shabby Art Boutique for a pumpkin coaster that I knew would be perfect. I also added it to the bottom of this post for easy access.

First cut the whole pumpkin out, and the stem off, like so:
 Trace that first whole piece onto your choice of fabric, and then cut off the outer two wedges of the pumpkin pattern like this:
 Trace your "second" pattern, and cut again the outer two wedges off, so you're left with the center of the pumpkin:
 Trace that last pattern as well as the stem onto your choice of fabric:
 So you will have four pieces like this:
 You will stack them on top of each other to form your pumpkin:
 When sewing your pieces together, start by sewing your second largest piece on top of the largest piece, just keeping on the outer edge of that second piece.  I liked the look of the raw edge, giving the pumpkin more texture.  Continue by sewing on the center piece of the pumpkin, and then pinning the whole pumpkin onto your fabric for the pillow.  I just cut a simple 12x12 square:
 Sew your pumpkin on, again by following along the other edge.  Including the stem:
 After your pumpkin is sewn onto the front of your pillow, create the pillow by taking the same sized square of fabric, and right sides together, sew along the edge, leaving about a 3 inch opening to allow yourself room to flip it inside out, and to fill your pillow... before filling my pillow, I added some "vines" using twined also outlined my stem with the twine.  I simply hot glued it on to the shape I wanted:
 Now it's time to stuff and close your pillow!  As I mentioned before, I ran out of actual polly fill, so I used left over tulle instead.  Close your pillow with a simple hand stitch.
 And enjoy!
 Have fun experimenting, with the layered pumpkins!  I decided that the shape was simple enough to try and draw up some of my own patterns for a tiny "pumpkin patch" pillow... For these stems I hand stitched them with embroidery floss before sewing on the back of the pillow form.  I also added some extra detailed stitching, and just had fun with it!  I'd love to see your creations if you end up making some of these pillows for yourself!  You can find me over on Instagram, @cherieamourblog and tag me in your photos!

Pattern from Shabby Art Boutique

Thanks so much for stopping by!


Friday, August 18, 2017

DIY Painted Pumpkins

 I've had a crush on those pretty blue-green heirloom pumpkins for some time now.  After finishing my lanterns hand crafted by Natalie from Crafts 2 You,  I knew I needed some of those perfectly colored pumpkins to display in them!  Nothing will ever beat the real deal live pumpkins.  Nothing.  haha!  But I think I found a pretty close second!  Let me share how you too can create these easy painted heirloom pumpkins...
 I first found pumpkins that stacked nicely, and that fit my lanterns.  I didn't care about the color (obviously) haha!  Just the shape and size.
 I found these pumpkin picks at Hobby Lobby.  They were perfect for my project!  It was simple to remove the stems and picks.  They just pulled right out.  I then used a wire cutter to cut off the picks.
 Now for the trial and error part:  Paint!  I just used some acrylic paint that you can find in any craft store.  Lucky for you, I did all the testing for you!  The green heirloom pumpkin definitely
 took me a few tries.  But I think I got it pretty close to the real thing.  From top to bottom of my stacked pumpkins, here are the colors I used:
 "Warm White" Americana acrylic paint. 
For the second pumpkin, I wanted it more of a blueish gray, to contrast with the heirloom pumpkin.  I first mixed equal parts of the "Sea Foam" and the "Drizzle Grey" and covered the whole pumpkin  with that.  It was still a bit too blue for me, so I lightly went over it with the "Dove Grey" on top, making sure to let the blue still peak through in some spots.

 Now for the heirloom pumpkin... I mixed together "Sea Glass" and "Mudstone" together... first adding the "Sea Glass" and slowly adding in the "Mudstone" till I got the shade I wanted it.  I would say about 3 parts of the sea glass to two parts mudstone.
 After that dried, I thought it still needed a little more dimension.  So I took the paint colors I mixed from pumpkin #2 (Sea foam and drizzle grey)  and added a bit of "Barn Wood" to darken it up a bit.  I watered it down also, and painted it into the creases of the pumpkin, wiping it down some with a paper towel to take away any brush strokes.
 And that's it!  Here is a close up of them, so you can see the details.  When you're finished, you can just pop the stems back on, or hot glue them on.  If you have some real pumpkin stems hanging around, that would be even better!  I left my stems off two of the pumpkins so I could stack them.  I will list all the colors for you at the end of this post, so you can easily make your own list of what you'll need.  I hope this tutorial was helpful!  I appreciate you stopping by!

I haven't officially started decorating for fall yet, but of course I had to style these real quick to show you the final product:  ;)


List of paint used:
Americana Acrylic Paints: Warm White, Dove Grey, Sea Glass
Delta Ceramcoat Paints: Drizzle Grey, Sea Foam, Mudstone
Folk Art acrylic paint: Barn Wood