I created the "He is Risen" sign in Photoshop. I also made the egg bunting and bunny silhouette.
Monday, April 14, 2014
Easter Mantel...
I can't believe Easter is already just a week away! I haven't had a spare minute to take any updated photos of my Easter decor this year, so you get to enjoy a few shots of my mantel from last year. :) And I was in such a rush even getting these up, I'm just now noticing an "oops" with my watermark on one of the photos. ugh. Oh well, maybe if I don't point out exactly where it's at, you won't even notice. ;) Anyway, here is last year's Easter Mantel...
I created the "He is Risen" sign in Photoshop. I also made the egg bunting and bunny silhouette.
I hope everyone has a fabulous Easter weekend! My kids new bedrooms are finally coming together, I hope to share my progress with you soon!
I created the "He is Risen" sign in Photoshop. I also made the egg bunting and bunny silhouette.
Wednesday, April 2, 2014
Personalized Easter Buckets & a Touch of Spring...
Easter has been sneaking up on me every year since my oldest was 2. It's always the same story; I'm scrambling 2 or 3 days before to find Easter basket goodies, AND a cheap Easter basket to fill said goodies with. I'm always on a budget, so I usually find the cheapest basket I can find, and then that basket never holds up to be used again the following year. This year I purposely put on my calendar a day to go out and get all of my Easter things well in advance. I even collected a bunch of coupons so I was not paying full price for anything. (Go Me!) The main thing on my list was to find an Easter basket that was going to hold up to my children! I found myself running into one little problem though: I couldn't find such a basket that was within my price range. My favorite baskets I stumbled upon were these personalized fabric ones:
Cute huh?!? I loved that they also seemed like an easy thing to store when not in use. But as much as I loved them, I simply could not pay the $18 price tag per basket plus shipping. (I wanted three baskets, (an extra so I wouldn't have to search again next year after child #3 was here)
Once again, Pinterest came to my rescue: Personalized buckets!!
Mine are much simpler than the ones pictured above, but they met all my wants and needs: Sturdy, cute, affordable, size was perfect (not so small you can't fit anything, and not so huge that I'd be scrambling to fill it up within budget) and SOOO easy to personalize! Check, check, check, check and CHECK!
I found my buckets at Target for $5 a piece. (Not quite as cheap as the dollar store, but MUCH cheaper than $18, plus I really liked the way these looked.) There were four different colors, and I went ahead and bought one of each variety. (I needed 3, and I ended up getting one more "just in case") ;) I let my oldest choose her own basket, her font and color of vinyl. And I cut out the vinyl lettering using my silouhette cameo! It took me literally less than 10 minutes to create and attach their names onto their buckets. When all was said and done, all four of my buckets cost me about the same as ONE of those fabric buckets. (even with the vinyl) I am one happy Momma! And my kids love them too. What kid doesn't love anything with their name on it? :)
And because it's been snowing the past couple of days in these parts of the woods, I thought I'd quickly share a touch of spring in my home:
I celebrated my birthday recently and received that pretty rose from some friends of mine. :)
I seriously LOVE decorating with all these little nests, eggs and birds. :)
Happy Spring everyone!! (Even if it is snowing) :)
Monday, February 24, 2014
Sneak Peak of the Girls Bedroom Makeover...
So this is more of a BIG peak at the girls bedroom makeover; since the fabric is pretty much what MAKES the room in my opinion. :) But I am soooo excited about all the bright fun colors going on here!! And that "something blue" that the fabric is sitting on, yeah I'm pretty excited about that piece too. ;) And sorry about the iPhone pic, I truly don't believe it does these fabrics justice.
We started and FINISHED painting our boy's room in less then a day!! The girls room won't be painted until we get another free Saturday... my calendar sure does book out quickly. :/ But that's ok, lots to do, lots to do. At the moment, I'm dedicating my spare time to "getting my quilt on!" :) Thanks for checking in... more to come! {eventually} ;)
Thursday, February 20, 2014
Perfectly Pink Big Girl Room...
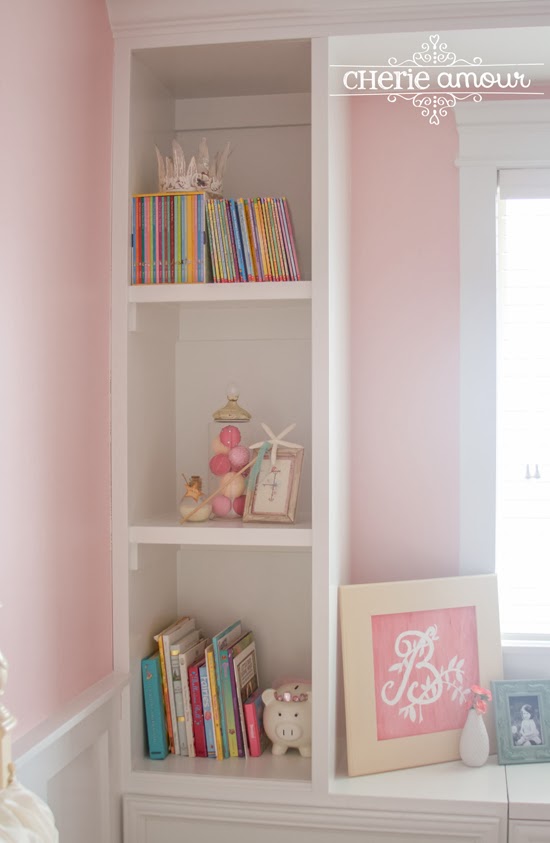
This room is the smallest in the house, but it doesn't lack in storage space, that's for sure. Because the room is so small, we opted to have some custom built-ins when we built our home a little over 4 years ago. And also, due to the small size of the room, and not having a very short lens, this was such a challenge to photograph!! But hopefully you get the overall feel of this little space. It has been a favorite spot for my little girl, (and myself) but she is excited for the upcoming changes for her new shared room with her baby sister. We shall see how long her excitement lasts once said sister arrives. LOL. Anyway, here is her first big girl room...
I didn't realize how much stuff in this room was hand crafted by myself and SIL until I started taking these photos... the bedspread and pillows were some of my very first sewing experiments!If you haven't guessed by now, we are big time lovers of books around here. My little B loves to stay up at night and read to her hearts content. I know she doesn't stay up too late, so I'm not complaining.
My SIL Cat, from Catherina's Creative Corner hand painted that beautiful letter B for me! I fell in love with the one she painted for her little girl, and she was so kind to make one for my sweet {B} too. Thanks Cat!!
Many of the little nicknacks have been collected over the years from my daughter's birthday's... like that little tinkerbell, and the little jars of pixie/fairy dust came from my daughter's 3rd birthday (Fairy themed of course)
Jars of pearls and star fish wand came from her mermaid themed party. Reuse, recycle!! :)
The mirror was first my sisters, then passed down to me, and somehow I got lucky enough to take it with me after moving out.
The framed castle and Cinderella coach are stickers!! My sister and I couldn't pass them up, so we decided to frame them for our girls' rooms.
I only most recently hung up this photo collage of my {B}... I'm so sad I already have to take them down! I mounted the large photos on foam board myself, you can view that tutorial over on my photography blog HERE.
I added the little beads to the lamp shade, because there wasn't enough girly bling in the room as it was. ;)
It was seriously impossible to get a full shot of the built-ins with such limited space, but hopefully you get an idea of them anyhow.
The window seat between the drawers opens up too, I guess sort of like a trunk, great for keeping some extra blankets that we take out and use during the colder months.The butterfly garlands hanging in her window are from her Butterfly party. :)
Friday, February 7, 2014
Woodland Animals Nursery...
These photos are well over a year old now, but I decorated this room before I ever had this blog... I thought I'd share them with you now because it won't be much longer until this room gets a complete overhaul! There won't be a speck of 'boy' left in this room when I'm done with it, as it will be shared by two sisters!! We're working on some serious rearranging with the new little babe coming.
As excited as I am for the transformation this room will be undergoing, I am also saddened to see this room change, after what seems not very long ago that it was first completed. A lot of love went into decorating this nursery, not just by myself but with the help of many of my sisters and hubby too! I will be keeping all that I can to move over into my boy's new room, so I'll still get to enjoy all the little details a while longer; but somehow it's still a reminder that my kids are growing up, and I'm not so sure I like that idea all too much. :/
That awesome owl lamp and stand that it's perched on was a gift from one of my sister in laws. He's such a handsome thing! I believe she said she found him at Gordmans? I could be wrong on that... but I know she created the little nest he's sitting in herself. :) She also gave me the matching table mat you see on the dresser. The little owl beanie is something I purchased for my boy's newborn photoshoot from THIS etsy shop, and of course had to display it in the room. He grew out of that thing so fast! :(
The sweet owl plaques were patterned after the owls from the baby quilt (very bottom photo) They are just some mdf that Mr. B cut out for me, and routered the edges and spray painted in heirloom white. I then cut out the owls using scrapbook paper and simply mod podged them onto the plaques. The floating shelves were also made by Mr. B. (but of course) :)
I started making these little felt animals but didn't get around to finishing them before my boy arrived. My dear sister (the same who made the quilt) finished them up for me and brought them to me at the hospital. What a gal! You can find the pattern for these darling little creatures HERE.
I made the pillow slip cover (you can view my slip cover tutorial HERE) The words were applied by turning some font backwards in photoshop, and printing it out on my computer, I then laid the printed font, ink side touching the fabric and got it wet with a little brush. After the letters were good and wet, I pressed over the letters and the ink came off the paper onto the fabric. It wasn't as dark as I had wanted it, so I simply went over it with a pen after it had dried.
The ever-so-adorable mama and baby fox were gifted to me from my sister in law (Cat from Catherina's Creative Corner) I believe she said she got them from Ikea. :)
The oh-so-precious water color art was another gift to me from the lovely Cat! I sooo love these! The quote on the wall was simply another plaque Mr. B cut out for me, and I typed out and embellished the quote in photoshop, printed it onto some heavy neutral card-stock and mod podged on just like the owls. I sanded the edges of the backing gray paper to give it a little more... something. ;)
The banner was a no-sew project using left over material from the quilt. Photos were taken by me, and I did a simple tutorial on how to create your own extra-big foam board prints over on my photography blog a while back... you can view that tutorial HERE.
And that is/was my sweet boy's nursery! Though many of these elements will be making it into his new room, it won't look anything like it does now... and you'll see why after I share my daughter's room with you. (the space he'll be moving into) :)
Tuesday, January 28, 2014
Playroom in Progress...
The playroom is a never-ending-story at my place. As is most of the rooms in my house, but the playroom is exceptionally so. I'm constantly trying to find the best solution for organizing this space, as it is also shared with my office. Yeah, the office/playroom. If that doesn't spell chaos for you, I don't know what does. Today I'll be sharing the playroom half... who am I kidding, the whole room minus one tiny corner is kid territory, but I'm still going to claim that tiny corner as mine (and Mr. B's) ;) Anywho...
Lets start with the largest feature of the room, shall we? You might have already guessed, Mr. B built the entertainment center for me. For some reason whatever idea that pops into my head doesn't ever exist, at least within my budget anyway, so Mr. B always comes to my rescue. I wanted the TV on the ground. Growing up with my mom doing Day Care my entire life, I've heard story after story of children getting seriously injured, even killed, from pulling TV's/ furniture on top of them. (these weren't her personal stories, but rather warnings from the news/ classes she was required to take for her license) She certainly struck that fear into me, and we bolt every piece of furniture we can to the walls, because lets face it, no matter how diligently you watch, children LOVE to climb.
I'll admit, the bins holding the toys aren't my favorite. I debated doing the wrap-a-cardbaord-diaper-box-with-fabric/burlap that we've all seen all over Pinterest, but somehow that just didn't seem like it would hold up very well. My kids are always pulling these things in and out, in and out, trying to sit in them, stand on them... you get the picture. I needed something more sturdy than decorated cardboard. These plastic bins were the cheapest I could find that actually fit in the cubbies. They are from Ikea. I also recently brought up all of our children's books that were being stored in my oldest's closet. (You know, to keep them out of harms way from the children who find tearing out pages to be a delightful past-time) ;) I had to get them out of her closet eventually though; we'll be needing the extra space as she will be soon sharing a bedroom with one of her siblings! (We're expecting baby #3 this June) :) Now I'm just on extra guard duty, assuring these books are not harmed. ;)Next to the entertainment center is the doll house/dress-up corner. Yup, STILL need to finish the dress-up trunk...
The rest is basically a nice open space for the kids to "run free." I dream of one day having a large child-height round table like my mother's in here, for fun crafts and teaching moments. But I'll just have to dream for now. :)
My gallery wall is one of those never-ending projects. All of these pictures were made by Yours Truly, minus the Rapunzel tower, which I purchased from THIS Etsy shop. It is truly a stunning little piece of watercolor art. I love it! I am far from being any sort of artist myself, but I still really enjoy creating pictures, and coloring when I have any spare time. I'd love to eventually fill this long wall end to end with pictures, but seeing how my spare time is next to nothing, it's going to take a while. It's taken me over 4 years to get this far! LOL.
For those of you who follow along my personal family blog... I FINALLY got around to painting the book shelf!! Yes, you should be so proud! :)
Here is what it looked like before:
This shelf houses the books that are toddler-proof. ;)
I made the 5x7 Alphabet flashcards in Photoshop using digital picture tiles "alphabet soup for boys" purchased HERE. I also bought the girl version, and just combined my favorites from both sets to make my cards. :) They are strung up simply on some twine using mini clothes pins and clear command hooks .
Next time I'll have to share the other half of the room. :) Thanks for stopping by!
Subscribe to:
Posts (Atom)