Friday, July 28, 2017

A Colorful and Whimsical Birthday...

*This post contains affiliated links* A colorful and whimsical birthday party for under $50, using "recycled" items, coupons, and a serendipitous sale!  This whole party came to life when I first stumbled upon the most ADORABLE candles I found while out shopping with my sisters one day.  The store was having a buy 3 get 2 free from ANY item in their store!  So I snagged me up a couple jars of them candles, along with a gift for the birthday girl, and a little something for me too.  (A hat, if you're curious)  
I later found a kit at a local craft store (Bennion Crafts) for the tassel banner and paper fan decorations.  I used a coupon for each of those.  Everything else, I had on hand from previous parties.  ...even the clear balloons, confetti, and helium to fill them up.  I made the cake and cupcakes, with yes, ingredients I happened to already have on hand.   I will still provide a source list at the end for you, if you're interested in finding anything else.  But I'm gonna quit the talking, and let you just enjoy the plethora of photos I took.  I could NOT stop with the camera.  LOL.


 My ten year old frosted these cupcakes herself!  Good job, honey!


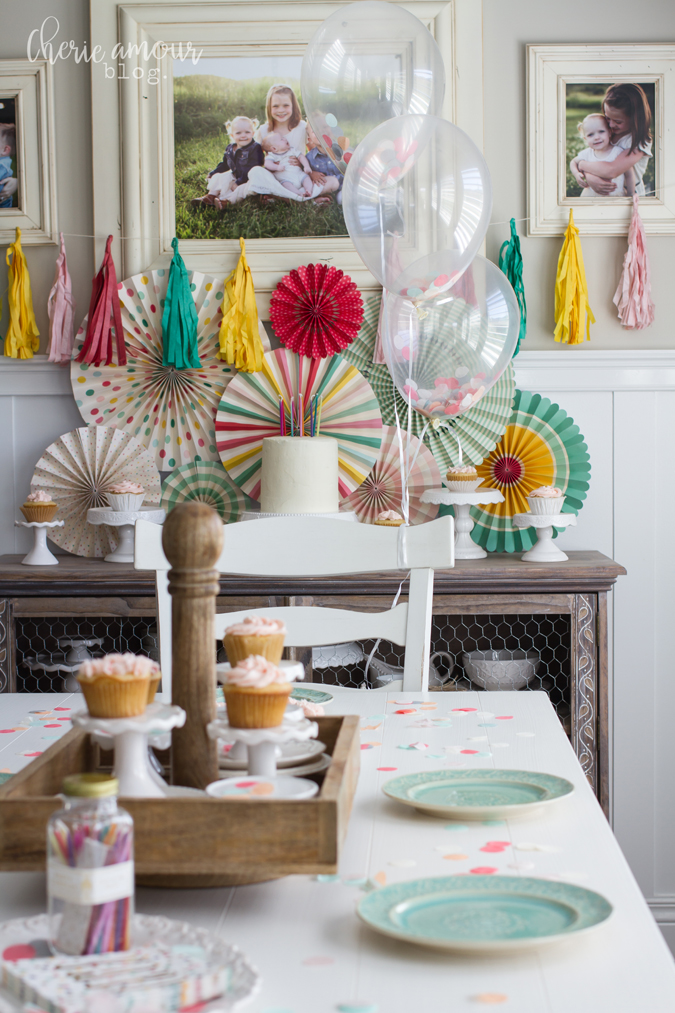
Please keep in mind that these are not necessarily where I purchased my items, as I didn't order anything online.  (except the plates, which I didn't actually purchase FOR the party, they just happened to arrive that very day, and so on a whim, decided to use them)  These are also not the prices I paid, I simply wanted to find the same items for you, if you were wanting to recreate this look for yourself.  :) 

Candles: made by SKEEM
Party Fans: My Mind Eye
Tassel Banner: My Minds Eye
Cake Plates: collected over the years at various places such as, Target, Joss and Main, Seagull Book, Tai Pan Trading, and Macey's
Clear Balloons: Zurchers
Mint Plates: Anthrolpologie (currently on sale for a limited time!)
Napkins: Zurchers
Wooden Tray Centerpiece: CF Home (local furniture store)

And that about covers it.  Thanks for stopping by, friends!


Thursday, July 23, 2015

Watercolor Painting Party...

With three birthdays to plan this year, (In May, June AND July, two of which were only a week apart)   I was definitely feeling a bit burnt out by the time the third party rolled around.  But I still did my best to give my daughter a fun and special birthday.  She has turned 8, and in my church, that is the age where children are then old enough to decide for themselves if they would like to be baptized.  (Needless to say, I've also been planning a baptism in the mix of all these birthdays!)  My mind was fried, and so, to Pinterest I went...  I found a few darling birthdays and asked my daughter what kind of party she would like.  She chose a Watercolor Painting Party.  Most of my inspiration was from THIS party.  Ashley, from The Handmade Home really outdid herself with that party!  It was truly GORGEOUS.  I didn't have quite the time or talent to put together such a lovely scene, but I did what I could with the time and budget I had to work with.  :)  Luckily my sister was kind enough to lend her talents to me and made my daughters cake.  It turned out SO beautiful!!  Thank you, Laura!!


I had the girls each decorate their own cupcake.  They each had their own little paint plate filled with different sprinkles...

My daughter was pretty excited to finally have the chalkboard decorated just for HER.  Unfortunately though, my "artistic ability" failed her expectations.  LOL.  She got over it though.  ;)

Simple balloons, some reused tassel banners from her sister's first birthday, and a fun watercolor banner made from coffee filters (made by my daughter) decorated the dining area.  I wish I got a better picture of the watercolor banner, but it wrapped over my windows, and the harsh light coming in made it impossible to photograph.  But you can see glimpses of it in the top left corner of the chalkboard photo, and the top right of the photo below:

Each girl took home their own painted masterpiece and paints, along with a little goodie bag of treats.


I had fun making the invitation and thank you tag for the goodie bags in photoshop.  These actually inspired some fun art prints for her bedroom! (That I will share when I get around to it) ;)
It turned out to be a fun little party!
Thanks for stopping by!

Wednesday, June 10, 2015

Little Birdie First Birthday Party...

My tiny girl's middle name is Wren... so naturally she had to have a little birdie first birthday!!  There's not much to say, because we just had some family over for dinner and cake to celebrate this little lovely of mine, so no games etc.  But I enjoy "party planning" SO much, I had a blast decorating for this little celebration.  I took a whole bunch of pictures for your enjoyment!  ;)
 I pulled the dresser out of her room to display the cake.  (I found the dresser on my local classifieds page, and painted it.)  Mr. B thought I was nuts for bringing it out of her room, but I thought it was the perfect touch.  :)
 Mr. B made me this awesome chalkboard a little while ago.  I was going to share it then, but never got around to it.  But now, here it is!  LOL.  I gave it a light stain and went over it with Miss Mustard Seed's white wax.  I love how it turned out!  And it makes for the perfect birthday "banner" for all my kid's birthdays.
I made the tassel banner from twine and tissue paper.  VERY easy.  There are some great tutorials on Pinterest for them.
 The cake is just a simple strawberry cake box mix, and some easy homemade buttercream.  The bird topper is made from homemade marshmallow fondant, I cut the shape with a cookie cutter.


  I had to display my favorite newborn photo of her, taken by Shanda Photography.  She was 6 days old in that photo.

 The cake was all for my little Wren... (it was just a small smash cake)  So for everyone else I made other desserts... chocolate cake trifle, brownie bites with sweet cream cheese topping and raspberries, and the most ADORABLE birdie sugar cookies made and decorated by my sister Ginger.  Thanks again Ginger!!!
 Glittered mason jars I made with my sister a while back... we continue to reuse them for the many birthdays and baptisms we have this year.  Flowers are from Costco...  I would LOVE to find a floral arrangement class of some sort!  I could use some tips on that.


 More detailed shots of the pretty Cookies.


 I found an old window that I repainted to hang her monthly photos on.  I wish I had a better place to display it, but the thing was too large to fit anywhere else.  I still love this tradition, that I picked up from my sis-in-law Cat over at Catherina's Creative Corner Blog.  It's so fun to see how much these babies change in that first year!

All other decor not mentioned are things I already had around the house, or from my baby's room.
 Not the best picture of us... but I still needed a photo with my baby on her first birthday.  I am so lucky she's mine.  :)  And this picture better shows the true scale of the chalkboard Mr. B made me.  It really is BIG.  I have so much fun with that thing.  LOL.

And I am just head over heals for this little lovely!!

Happy Birthday Little Wren!!


Friday, January 23, 2015

Valentine Decor 2015

     My Valentine decor has definitely changed since last year (view last year's HERE.)

     This year my sister showed me some adorable Valentine decor items from a local boutique, and I instantly fell in love!  Only problem was, I didn't have $120 to spend.  And so, roughly $8 worth of wood, a $7 frame, a little paint, nails and twine we had on hand, and some scrap paper lying around, my sister, Mr. B, and I whipped up this little vignette in just a day.  (we made three whole sets, and had a newborn to tend to, so I felt pretty accomplished.)  Mr. B of course did all the cutting of the wood, and screwed things together for us.  My sis and I did the rest.
 The "sweet" plate is a simple white plate I already had and added the "sweet" by cutting out some gold vinyl using my silhouette.

A closer view of the "Be Mine"  I also used my silhouette to make the stencil for this.
 And just a little touch of valentines in the kitchen:
I still have my other items from last year throughout the house, but as you can see from my lack of posting anything the past 3 months, I was too lazy to photograph them.  LOL.
I'm not very good at keeping up on this blog, but that's ok.  That just means I'm busy with other things... things that have a bit more importance over this blog.  ;)

I have quite a few events I'm planning this upcoming year though, and I'm making it a goal to share all of those and look forward to doing so.  So thanks for checking in every once in a while!  :)

Friday, September 26, 2014

Halloween Decorating with my Silhouette...

So last year I knew I was going to be getting a Silhouette Cameo for Christmas, and after seeing those fun paper bat displays on pinterest, I was litterally begging Mr. B to give my gift to me early!  Didn't happen though.  But, I have my silhouette for THIS Halloween, and I've litterally been going "bat crazy!"  And I've been cutting out more than just bats... here is what my Silhouette and I have been up to the past couple of weeks...
 These pictures don't do these bats justice.  They were so hard to photograph!  My entry way is very narrow, but VERY tall.  I litterally had to step out my front door to take these.  (and don't mind the mix of summer decor on the mantle, the bats were the first of my Halloween to go up, and I was too excited to wait to photograph them)  ;)


 Yes, more bats.  Had to add some gold glitter to this little display...

 A black cat adorned in black glitter...  you really can't have too much glitter.  ;)


 And even though I went crazy happy with the bats, I think these trick or treaters may just be my absolute favorite!  The tiny details the silhouette can cut just amazes me.  I should've taken a better close up, but you can see how awesome their treat bags are.
I still plan on cutting just a few more silhouettes, but I have yet to find the right frames for them.  I'll be sure to update you when they're finished.  Thanks for stopping by!

Wednesday, September 17, 2014

Stairway Gallery Wall...

This little wall has been a loooong work in progress.  I have been collecting frames, one here, one there, over the past couple of years, and have been spray painting them all heirloom white as I got them.   I finally collected enough frames to fill the space and got them all hung up, but then it took me another long while to finally fill them all up with photos.  Tis how I work around here.  At one point I had so many empty frames hanging in my house, Mr. B told me he wasn't going to hang another single thing for me until I filled the ones I already had.  LOL.  I became the notorious empty frame hanger.
 My stairs have open railing on both sides, but only half way up, and then the one side stops at a wall.  And then directly at the top of the stairs is a closet door, so this wall space is relatively small.  As much as I'd love a GRAND stairway gallery, this is as good as it gets around here.  Although, I've been debating having the frames wrap around that corner there above the railing to the left of the photo. (picture above)

 My sister in law Cat, from Catherinas Creative Corner made me this beautiful genealogy fan, which was the start of this whole wall.  My initial idea was to have only old black and white photographs of my ancestors surrounding this framed fan.  While I have those photos in other parts of my home, somehow they all didn't make it onto the wall.  Perhaps I'm just too in love with my kids??  LOL.  Oh well, some of them made it there anyway.  ;)

I'm not one to cut out paper templates to hang my gallery walls.  I do lay it out on the ground first to get a general idea of how I want it to look, but for the most part I just wing it; telling Mr. B "Ok, put this next one here." as we go.  :)